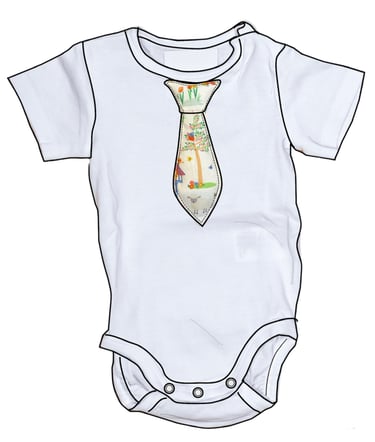
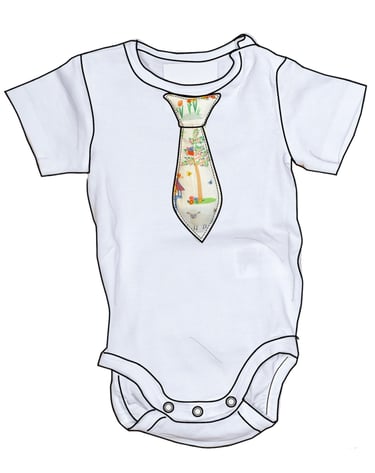
Applique 'Tie' Tutorial - For Baby and Toddler

Easy Sew: 3D Effect Appliqué Tie; Free Tutorial and printable Pattern
Difficulty: Easy
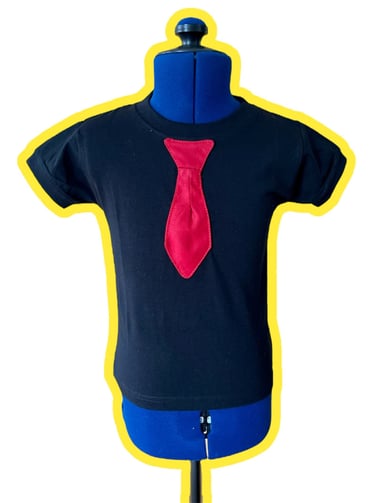
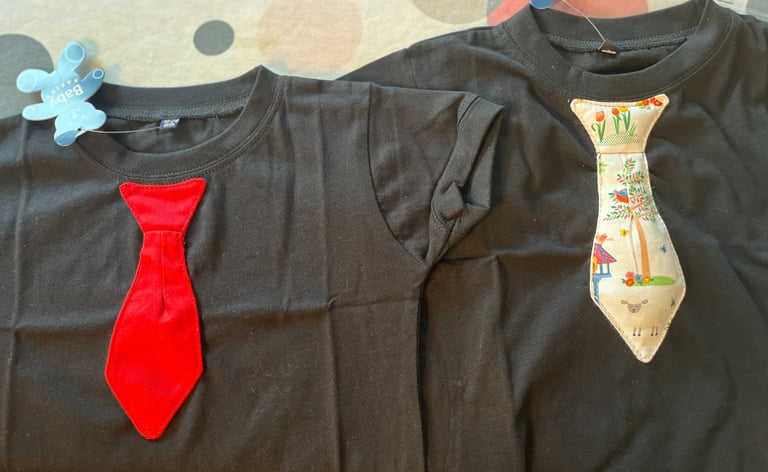
Design and Make a simple and quick tie appliqué for a onesie or t-shirt for a baby or toddler. (onesize: The completed tie measures approximately 16 centimetres.) You can have a tie with a filling that is soft and squishy, which is fantastic, or a tie without any filling. Both include a pleat to give the tie some shape, and they are constructed from two pattern pieces.
A tie appliqué is a quick and imaginative fix, whether you need them to dress up for a special occasion or just because they look so cute. With some woven fabric, scissors, and simple sewing supplies, you can make it yourself. There is no need to worry about tying a real tie or choking hazards. A tie appliqué is a safe option for your little one!
It's easy, inexpensive, and customisable. You can use any fabric you like, from scraps to new prints. All you'll need is my free printable PDF design, which you can download below, some simple sewing equipment, and some basic sewing knowledge.
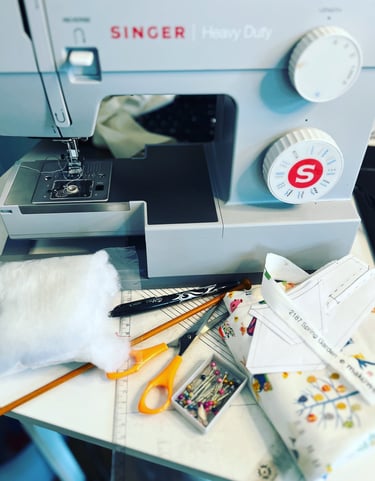
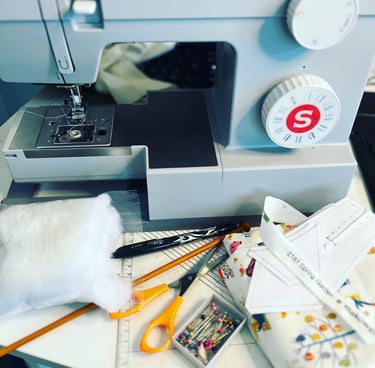
You will need:
* Seam Allowance is 5mm / 0.5cm / ¹³/₆₄"
- A t-shirt or onesie (something to add your tie to)
- Fabric (scraps / fat quarters / woven prints or plains)
- Scissors, thread, etc
- Soft fill (optional)
(please note the illustrations for the tutorial are not to scale)
Option 1 - No stuffing
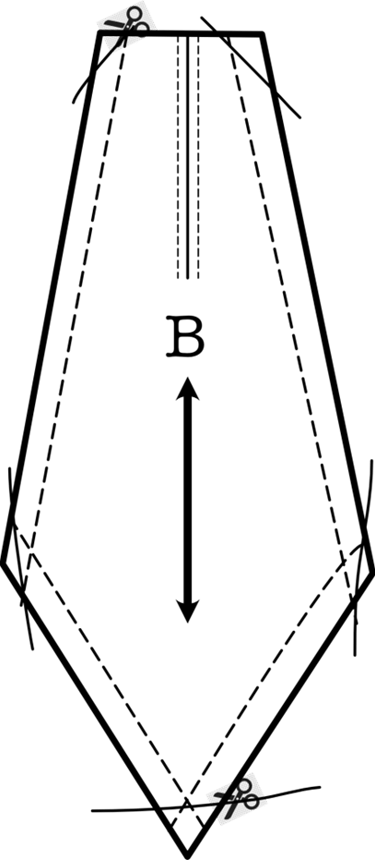
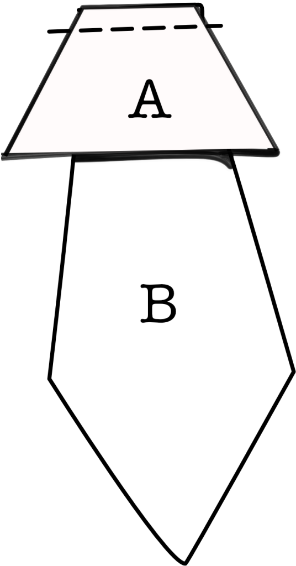
Print the pdf pattern and cut out the templates for your selected fabric. The pattern includes a 0.5cm (¹³/₆₄") seam allowance. Cut each template from the fabric twice
Template A: Place together with the right sides (RS) facing, and sew along the three edges: the two sides and the one longer edge. Clip the corners and turn to the right side out. Press.


Template B: Place the two pieces RS together and sew around all edges except the top. Clip the corners and turn out to the right side. Press
Using the template, transfer the pleat line onto the WS of the fabric. (Mark onto the side that will face down onto the T-shirt.)
Fold along the pleat line. Press.
Stitch using a straight line, 5mm away from the fold line. Sew 5cm down, as shown on the pattern piece.
*Ensure this is back stitched securely at the top and bottom.
Press the pleat flat open.
Now attach Template A and B, right sides facing and stitch using a 0.5cm SA. Press (finish the raw edge with a serger/overlocker if desired) Next, pin the tie in place into the garment. Check it is centred (tip: fold the garment in half to find the middle point).
When happy with the placement, carefully appliqué the tie shape onto the selected garment, either with a straight line small stitch or a very small tight zigzag stitch close to the edge of the tie.
below Example is on an 18/24 month t-shirt


Option 2- stuffing (this gives the tie a soft, squishy feel and look)
The only difference is that you pleat twice. You need to pleat on both of the template B pieces; this then allows room for the stuffing to go inside the completed template B piece!
Template A: Place together with right sides (RS) facing, and sew along the three edges: the two sides and the long edge. Clip the corners, and Turn to the right side out. Press.
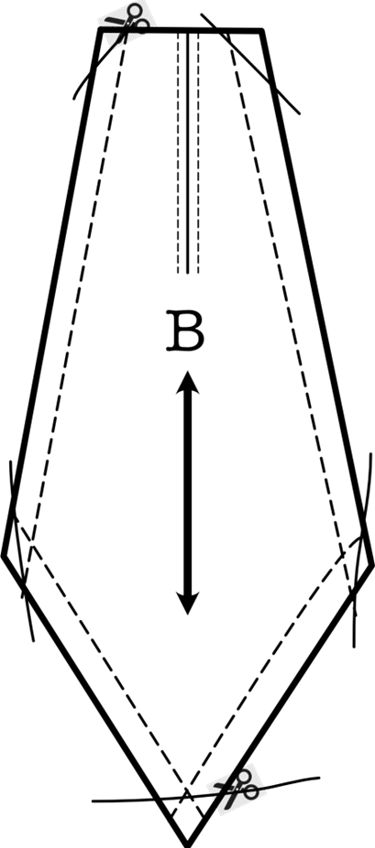
Template B: Using the template, transfer the pleat line onto both pieces of fabric, working on the WS (wrong side) of the fabric.
Fold along the pleat lines. Press.
Stitch using a straight stitch, 5mm away from the fold line. Sew 5cm down, as shown on the pattern piece.
*Ensure this is reverse stitched securely at the top and bottom.
Press the pleats flat.
Place the two pieces of Template B's right sides together and sew around all edges except the top. Clip the corners and turn out to the right side. Press.
Important: stop and check that you have no holes in the stitching line.
Next, fill the two shapes with a soft fill; don’t overfill.


Now attach Templates A and B (RS), right sides facing, and stitch using a 0.5cm SA. Ensure you reverse stitch to secure the stitching line. Press (finish the raw edge with a serger or overlocker, if desired).
Next, pin the tie in place on the garment. Check that it is centred.


When happy with the placement, carefully pin the tie shape onto the selected garment, to applique select either with a straight line small stitch or a very small tight zigzag stitch close to the edge of the tie. Your tie should now be firmly attached.
*Check for loose threads and stray stuffing, and double-check that you have no holes for stuffing to escape from before allowing a baby or young child to wear their new customised clothing.
Congratulations! You have made a 'tie' applique for your child's t-shirt or onesie! Now they can rock their new look with pride!